How to Install Windows 11 for Free (Step-by-Step Guide 2026)
I installed Windows 11 the wrong way the first time. Downloaded a random ISO from some sketchy site, spent two hours creating a bootable USB with a tool I didn’t fully trust, and ended up with an installation that couldn’t get proper updates for weeks. Second time, I did it the official way through Microsoft’s own tools, took maybe half the time, worked perfectly, and I’ve been on that install ever since.
If you’re looking to move to Windows 11 from Windows 10, or install it fresh on a PC, this guide walks through the entire process using only official tools. No shady sites, no cracked keys, no risk of malware. It’s genuinely free from Microsoft themselves.
Can You Legally Install Windows 11 for Free?
Yes, and this is worth being clear about upfront: Microsoft still offers Windows 11 as a completely free upgrade for eligible Windows 10 PCs in 2026, and there’s currently no announced end date for this offer. If you have a genuine, activated Windows 10 license, you can move to Windows 11 at no cost, and your Windows 10 digital license automatically converts to a Windows 11 digital license during the process.
A few things worth knowing:
- The upgrade is like-for-like: Windows 10 Home upgrades to Windows 11 Home; Windows 10 Pro upgrades to Windows 11 Pro. You can’t jump editions for free.
- Windows 10 support officially ended in October 2025, though Microsoft has since extended free security updates for consumers through October 2026 as an extra grace period. Staying on Windows 10 long-term is a genuine security risk.
- Fresh installs on a PC that never had Windows before technically need a valid product key, but on any PC that previously ran an activated Windows 10 install, Windows 11 will auto-activate the moment it connects to the internet, no key entry needed.
If your PC doesn’t meet Windows 11’s hardware requirements, there are unofficial workarounds (like Rufus’s bypass option), but I’ll be honest, these come with real risks around future updates, and Microsoft explicitly doesn’t guarantee unsupported installations will keep receiving updates. I’ll cover the official supported path in this guide; the unsupported route is a rabbit hole worth researching separately if you decide to go that direction.
Check If Your PC Supports It
Before anything else, run Microsoft’s official compatibility check. Windows 11’s hardware requirements are notably stricter than Windows 10’s, and a lot of otherwise-fine PCs get filtered out.
Minimum Windows 11 requirements:
- 64-bit processor from Intel 8th generation or newer, or AMD Ryzen 2000 series or newer (older CPUs are not supported)
- 4GB RAM minimum, 8GB recommended
- 64GB storage minimum
- TPM 2.0 (Trusted Platform Module, a security chip on your motherboard)
- Secure Boot capable UEFI firmware
- DirectX 12 compatible graphics
- 720p display, 9″ or larger
How to check:
- Go to Microsoft’s official Windows 11 page and download PC Health Check
- Run the app after installing
- Click Check now near the top
- It’ll tell you clearly whether your PC meets each requirement, and specifically which ones it fails if any
The two most common failures are TPM 2.0 not being enabled (often it’s present but disabled in BIOS, which you can turn on) and an older CPU that’s genuinely not on Microsoft’s supported list. If TPM is your only fail, keep reading, we’ll cover enabling it in the BIOS section. If your CPU isn’t supported, official upgrade paths are closed to you, though unsupported bypass installs still exist as an option.
Free Upgrade From Windows 10 (Easiest Method)
If PC Health Check gives you a green light and you’re currently on Windows 10, this is genuinely the easiest path, no USB drive needed, no BIOS changes, no reinstalling your programs.
Method 1: Windows Update (simplest)
- Open Settings > Update & Security > Windows Update
- Click Check for updates
- If Microsoft has rolled the update out to your PC, you’ll see “Upgrade to Windows 11 is ready, and it’s free!” appear
- Click Download and install
- Wait for the download and initial preparation (can take 30-60 minutes)
- Restart when prompted, the actual upgrade runs during restart
Microsoft rolls out the upgrade in waves, so if it doesn’t appear on your specific PC yet, that’s normal even when your hardware is eligible.
Method 2: Installation Assistant (forces the upgrade)
If you don’t want to wait for Windows Update’s rollout schedule, Microsoft’s Installation Assistant lets you force the upgrade immediately:
- Go to Microsoft’s official Windows 11 download page
- Under Windows 11 Installation Assistant, click Download Now
- Run the downloaded tool
- It scans your system, confirms compatibility, then downloads and starts the upgrade
- Follow the prompts and let it complete, this takes roughly an hour total depending on your internet and PC speed
Both methods preserve all your files, installed programs, and settings. Your Windows 10 license automatically becomes a Windows 11 license during the process. If you don’t like Windows 11, you have 10 days to roll back to Windows 10 with all your files intact via Settings > System > Recovery > Go back.
Download Official ISO From Microsoft
If you’re doing a clean install (fresh install wiping everything) or need to install Windows 11 on a PC that doesn’t currently have Windows 10, you need the official ISO file.
- Go to Microsoft’s official Windows 11 download page (microsoft.com/software-download/windows11)
- Scroll to the section labeled Download Windows 11 Disk Image (ISO)
- Select Windows 11 (multi-edition ISO) from the dropdown and click Download
- Select your product language, then click Confirm
- Click 64-bit Download on the next screen
- Wait for the download to complete, the file is roughly 5-6GB
Keep this ISO file somewhere you can find it. You’ll use it in the next step to create a bootable USB drive.
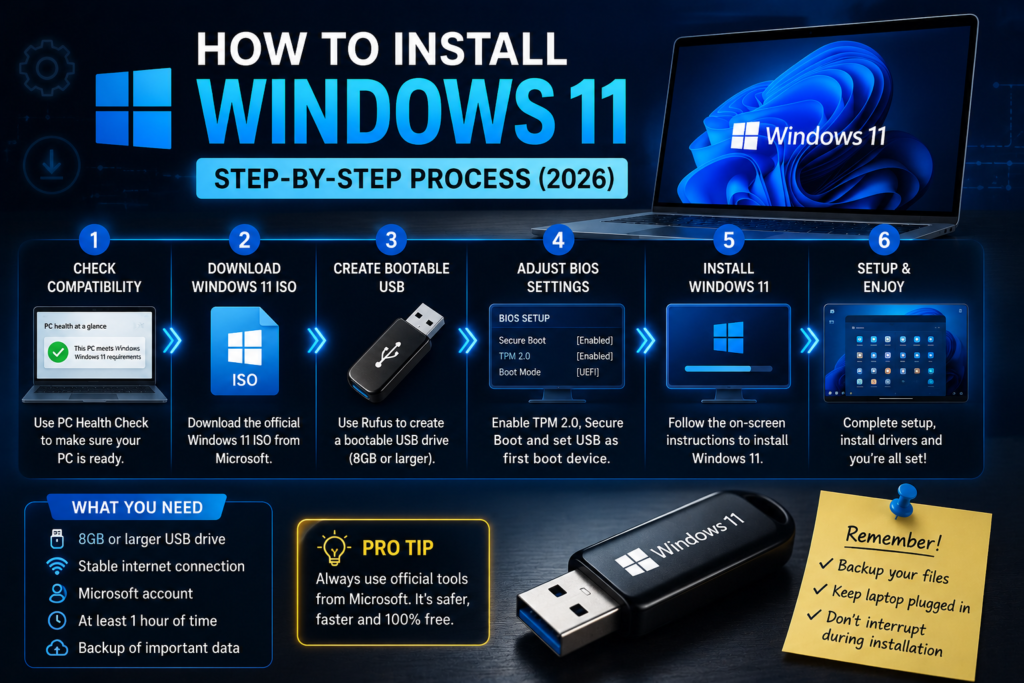
Create Bootable USB Step by Step
For a clean install, you need to put the Windows 11 ISO onto a USB drive so you can boot from it.
What you need:
- A USB drive with at least 8GB capacity (16GB or larger is safer)
- The Windows 11 ISO you just downloaded
- Rufus (a free, trusted tool for making bootable USB drives, download from rufus.ie)
Warning: this wipes everything on the USB drive. Back up anything important on it first.
Steps using Rufus:
- Plug in your USB drive
- Download and open Rufus (no install needed, it runs directly)
- Under Device, select your USB drive
- Under Boot selection, click SELECT and choose the Windows 11 ISO
- Leave Partition scheme as GPT and Target system as UEFI
- Under File system, leave as NTFS (or select FAT32 if your PC specifically needs it)
- Click START
- Rufus will ask about Windows setup options, you can leave defaults selected for a standard install
- Confirm you’re okay with wiping the USB drive when prompted
- Wait for the process to finish, typically 10-20 minutes
Once done, your USB is ready to boot from. Leave it plugged in and move to the next step.
BIOS Settings Before Installation
Before booting from the USB, you may need to adjust a few BIOS/UEFI settings, especially if TPM 2.0 or Secure Boot is currently disabled.
Enter your BIOS:
- Restart your PC
- During the initial boot logo, repeatedly press the BIOS entry key, this varies by manufacturer:
- Dell: F2 or F12
- HP: F10 or Esc
- Lenovo: F1 or F2
- ASUS: Delete or F2
- MSI: Delete
- Acer: F2 or Delete
- If you miss it, restart and try again
Settings to check:
- Enable TPM 2.0: search in your BIOS menus for “TPM,” “Intel PTT,” “AMD fTPM,” or “Security Device Support.” Enable it. On some newer motherboards it’s on by default.
- Enable Secure Boot: usually under a “Boot” or “Security” tab. Make sure it’s enabled.
- Set boot mode to UEFI, not Legacy: Windows 11 requires UEFI mode. If you see options for “CSM” or “Legacy Boot,” disable them.
- Change boot order: move your USB drive to first priority so the PC boots from it on next restart.
Save changes and exit (usually F10), then let the PC restart. It should boot from your USB drive automatically.
Clean Install Walkthrough — Every Screen
Once your PC boots from the USB, you’ll see the Windows Setup screen. Here’s what each screen wants:
- Language, time, keyboard: confirm these are correct, click Next
- Install now: click this button (top of screen)
- Product key: if the PC previously had Windows 10 activated, click “I don’t have a product key” – Windows will activate automatically after install. If it’s a brand new PC or a wiped one, enter your Windows 11 or Windows 10 key.
- Choose your Windows edition: pick Home or Pro to match your license. Choosing wrong edition means it won’t auto-activate.
- License terms: check the box, click Next
- Type of installation: choose Custom: Install Windows only (advanced) for a clean install. The Upgrade option only appears if you ran setup from within existing Windows, not when booting from USB.
- Where do you want to install: select the drive/partition to install on. If it’s a fresh drive, click New to create a partition. If you have existing partitions and want a truly clean install, delete them (this wipes all data on the selected drive, so back up first).
- Installation begins: takes 15-30 minutes on most PCs, the PC will restart a few times automatically
- Region and keyboard layout: confirm your country and keyboard
- Sign in with a Microsoft account: Windows 11 Home essentially requires a Microsoft account online. Enter your email/password. If you’re setting up accounts fresh, it’s also a good time to make sure your email itself looks professional — something I covered separately for Gmail, though the same principles apply here.
- PIN setup: create a PIN for faster local sign-in
- Privacy settings: choose which telemetry and diagnostic settings you’re comfortable with, this is genuinely worth reading rather than clicking Accept on defaults
- Optional experiences customization: you can skip these
- Final setup: takes 5-10 more minutes preparing your desktop
Once you’re at the Windows 11 desktop, the install is done.
First Things to Do After Install
A quick checklist to get your fresh Windows 11 install in good shape:
- Run Windows Update: Settings > Windows Update > Check for updates. Install everything, this catches security patches and driver updates you’ll need.
- Install proper drivers: Windows Update handles most, but graphics card drivers direct from NVIDIA, AMD, or Intel’s own sites often work better than what Windows installs by default.
- Confirm activation: Settings > System > Activation should say “Windows is activated with a digital license.” If it doesn’t, wait 24-48 hours since some activations take time.
- Set up your browser: Windows 11 defaults to Edge; install Chrome, Firefox, or whatever you use if you prefer.
- Install essential apps: office suite (Microsoft 365, LibreOffice, or Google Docs), your password manager, antivirus if you use anything beyond Windows Defender, and any specific programs you rely on. If you also use a VPN for privacy or work access, it’s worth setting that up early too — I compared the best free options in a separate guide.
- Turn off unwanted startup apps: Task Manager > Startup apps tab, disable anything you don’t want launching automatically.
- Adjust taskbar and Start menu: Windows 11’s default taskbar is center-aligned; right-click it > Taskbar settings to move it back to the left if you prefer, and pin your most-used apps.
Common Installation Errors and Fixes
“This PC can’t run Windows 11”: either your hardware genuinely doesn’t meet requirements, or TPM/Secure Boot aren’t enabled in BIOS. Re-run PC Health Check to see exactly which requirement failed.
Setup gets stuck at “Getting things ready” or similar screens: genuinely just wait, some phases take 30+ minutes with no visible progress. Only worry after 2+ hours.
“Something went wrong” error during Windows Update upgrade path: try the Installation Assistant instead, since it forces a fresh download of the update.
USB not showing as bootable option: re-check BIOS boot order, and confirm the USB was created for UEFI mode in Rufus (not Legacy/MBR).
Activation fails after clean install: if the PC previously had Windows 10 activated, sign in with the same Microsoft account you used before, this often triggers automatic activation via linked digital license.
Rollback to Windows 10 needed: Settings > System > Recovery > Go back within 10 days of upgrading. After 10 days, you’d need to clean install Windows 10 from scratch.
Drivers missing after install (WiFi, audio, etc.): run Windows Update multiple times, most missing drivers appear after 2-3 update cycles. If WiFi driver itself is missing, you may need to download the driver on another device and transfer via USB to install manually.
Bringing It Together
The upgrade-from-Windows-10 path is genuinely the easier route for anyone already on Windows 10, no USB creation, no BIOS changes, no reinstalling programs. Reserve the clean-install USB method for fresh builds or when you specifically want to wipe everything and start over.
Whichever path you take, staying with official Microsoft tools (Windows Update, Installation Assistant, official ISO from Microsoft’s site) is genuinely worth it. Third-party download sites offering “pre-activated” Windows 11 ISOs are one of the most common ways people get malware on their fresh install, and there’s simply no reason to use them when Microsoft gives it away legitimately.